Tutorial: Rendering lightmaps with RTTGroup plug-in.
Before starting the tutorial make sure that 3ds Max displays textures in shaded viewports with the highest quality. In order to do so do the following:
- Select: Customize menu > Preferences > Preference Settings dialog > Viewports tab > Display Drivers group > Configure Driver button.
- You are now in the driver configuration dialog - turn on Match Bitmap Size as Closely as Possible option available in Download Texture group.
This tutorial explains the necessary steps to create lightmaps - textures containing lights and shadows cast on the objects in a scene.
- Prepare an example scene with several light sources, possibly colored, casting multiple shadows on the objects.
- Select the Helpers panel, choose the standard helper set and click the RTTGroup button.
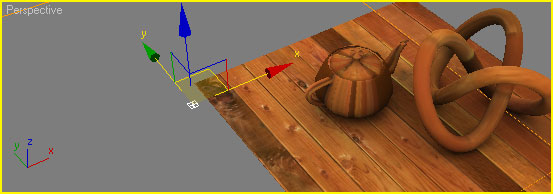
- Insert the RTTGroup helper somewhere in the scene - click on any of the viewports, preferably the top view. A new icon appears, named with the default name RTTGroup01. When the icon is selected the orange-colored square appears and shows a size of texture created by the plug-in in relation to the object sizes.
- Choose the Objects rollout and click the Add button. The object selection dialog pops up. Select all objects from the scene.
- Check the Create New Baked option. This creates a template material for baked lightmap materials. All materials containing lightmaps will be based on it.
- Click the Texture Elements button invoking another dialog window. You can choose render elements there. The Output Path edit field shows the destination folder for the texture files. You can also specify a filename template used when the rendered textures are stored on the disk.
- Click the Add button invoking the Add Texture Elements dialog.
- From all possible texture elements shown there select LightingMap and click OK.
- Now set Target Map Slot to Diffuse Color. This instructs the program to automatically assign the lightmap textures to the diffuse color bitmap slot.
- Close the Texture Elements dialog.
- Return to the Unwrap rollout and using a Grid Size parameter make the size of orange-colored square to match the scale of objects from which you want to render the textures. The Grid Size parameter specifies the size of resulting texture pixels (in our case lightmap pixels). The smaller value the higher precision of rendering but at the expense of increased number of textures. The orange square dimension is equal to Texture Width multiplied by the Grid Size.
- Click the Unwrap button in Objects rollout. This unwraps all objects assigned to the RTTGroup. You will immediately see the number of resulting textures in a Textures per TE window. If the number is too high, increase the value of Grid Size and click Unwrap again.
- Now switch to the Utilities panel and click More... button.
- Select the Render To Texture utility. The recently created helper RTTGroup01 should appear on the list.
- Click the Render button.
- When the render finishes, each object assigned to the group has a new type of material - Shell Material. The shell material is a simple container with two slots - one for the original material (previously assigned to the object), second for the baked material (created during render to texture process).
- You can choose which of those two materials will appear in the viewports (in shaded view) and in the rendered images - use appropriately named radio buttons.
- Select any object belonging to the RTTGroup. Switch to the Modify panel.
- Notice a new modifier on the object's modifiers stack - RTT UVW Map. This modifier keeps UV mapping coordinates created during the unwrapping process and new material IDs for baked material. The Apply Material IDs checkbox is active when the baked material is selected for viewing or rendering.
- Switch back to the Utilities/Render To Texture panel and activate baked material visibility in the viewport.
- Add a new light to the scene or move any existing one. You should notice that the light changes still affect the lightmapped objects. This is needed when working with original textures but the lighmaps shouldn't be affected by the lights in the scene anymore. The baked texture materials have to be self-illuminating, ignoring any lights in the scene.
- Select the RTTGroup01 helper and activate the Modify panel.
- Open the Material Editor.
- Click on the Put to Material Editor button in Output rollout. The instance to RTTGroup material should appear in the active slot of the Material Editor. You can edit the settings for this material (a base for baked materials).
- Find a Self-Illumination group in Blinn Basic Parameters. Check the Color checkbox and select white color.
- Render the textures again.
- Now any light changes won't affect how the baked materials are displayed.
- Repeat the tutorial but use the CompleteMap texture element instead of LightingMap.